Resize a Centos 7 Virtual Machine in KVM/QEMU
Being relatively new to the RHEL/Centos world, it’s safe to say I’m learning a lot as I go. While Linux is mostly, well, Linux between distributions, each one has its own particular nuances.
One of these nuances bit me last weekend on a new Centos 7 VM. I was spinning up a borg-backup server to back up my roughly 50GB Nextcloud instance, so I provisioned a 160GB qcow2 image to give it adequate wiggle room. After logging in for the first time post-install, I was dismayed to see only 100GB available for backup. It turns out that Centos 7 default paritioning included separate / and /home partitions, and allocated a whole 50GB for root. What good is 50GB going to do me when all I’m instaling is borg?
One additional differentiator of RHEL/Centos from Ubuntu is the use of XFS as the default filesystem. XFS is a solid, feature-packed filesystem, but one thing it can’t do is shrink. This ruled out shrinking / and expanding /home, so I decided to eat my mistake and just expand the whole VM. Below is the process for future reference.
Extend the QCOW2 Image
Shut down your VM
$ sudo poweroff
SSH into your host machine and run the qemu-img tool on your VM guest image. I added an additional 100GB in the example below.
$ sudo qemu-img resize /path/to/image.qcow2 +100G
Image resized.
Extend the Partition
Since resizing root LVM paritions can be difficult from a running system, we’re going to boot into a live environment for the remaining steps. You can use any Linux live environment for this, but I’ll be using GParted to keep things simple.
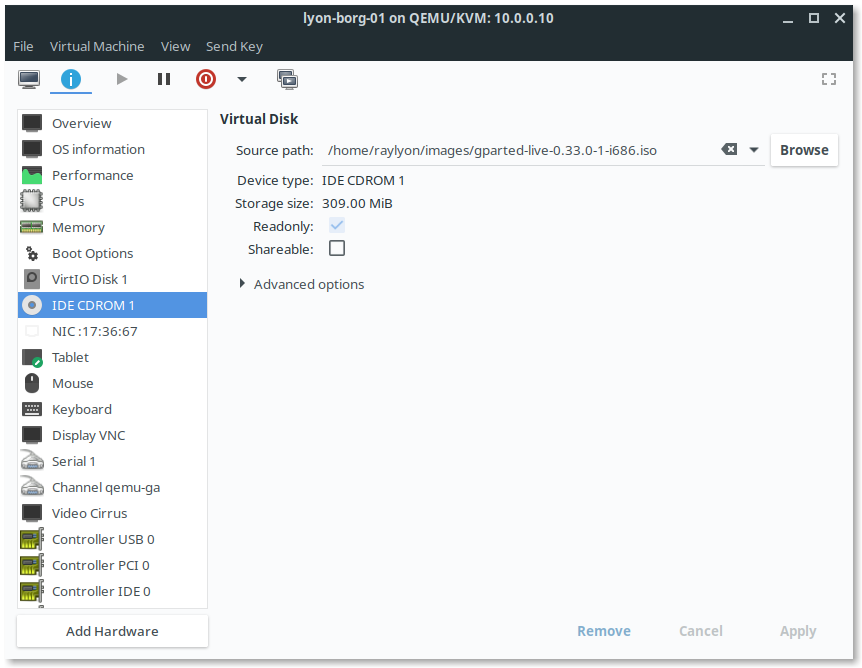
Open up virt-manager and load the GParted ISO into the VM’s optical drive, then click Apply.
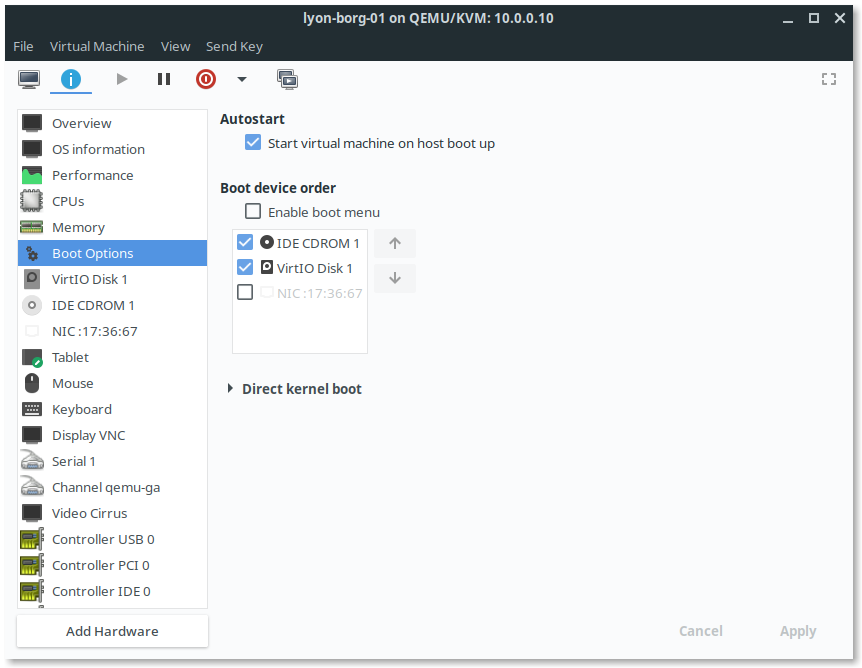
Select Boot Options and enable the optical drive before moving it to first in the boot order, then click Apply.
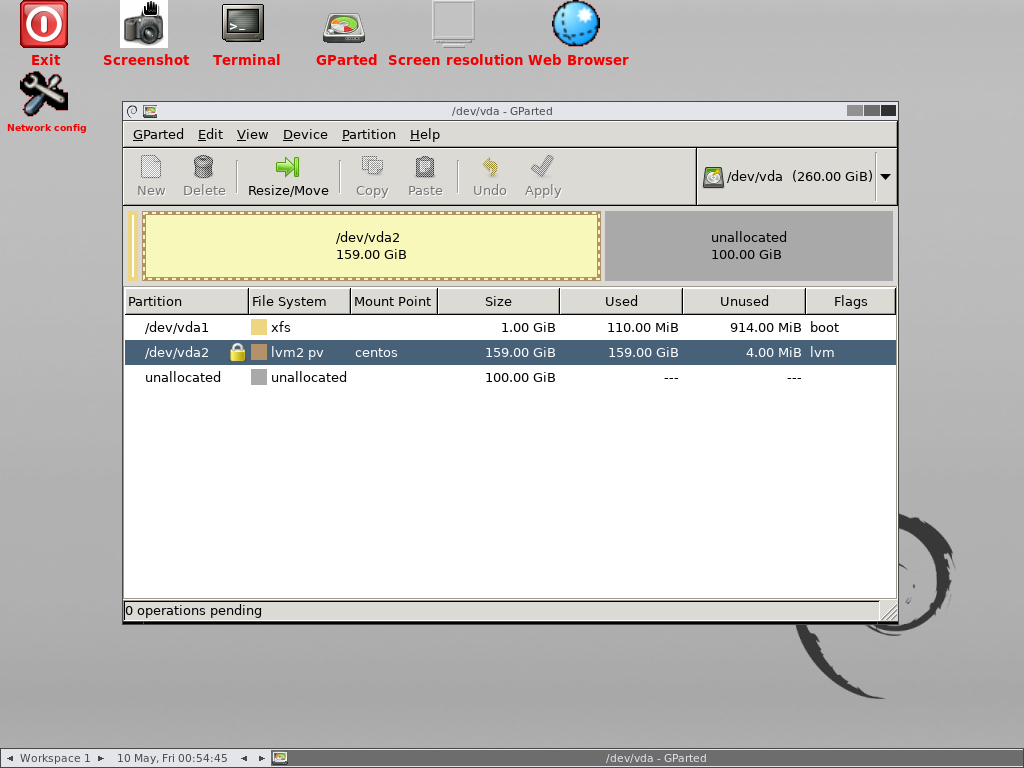
Start your VM and follow the prompts to boot into the GParted live environment. You should notice the extra space you added as “unallocated”.
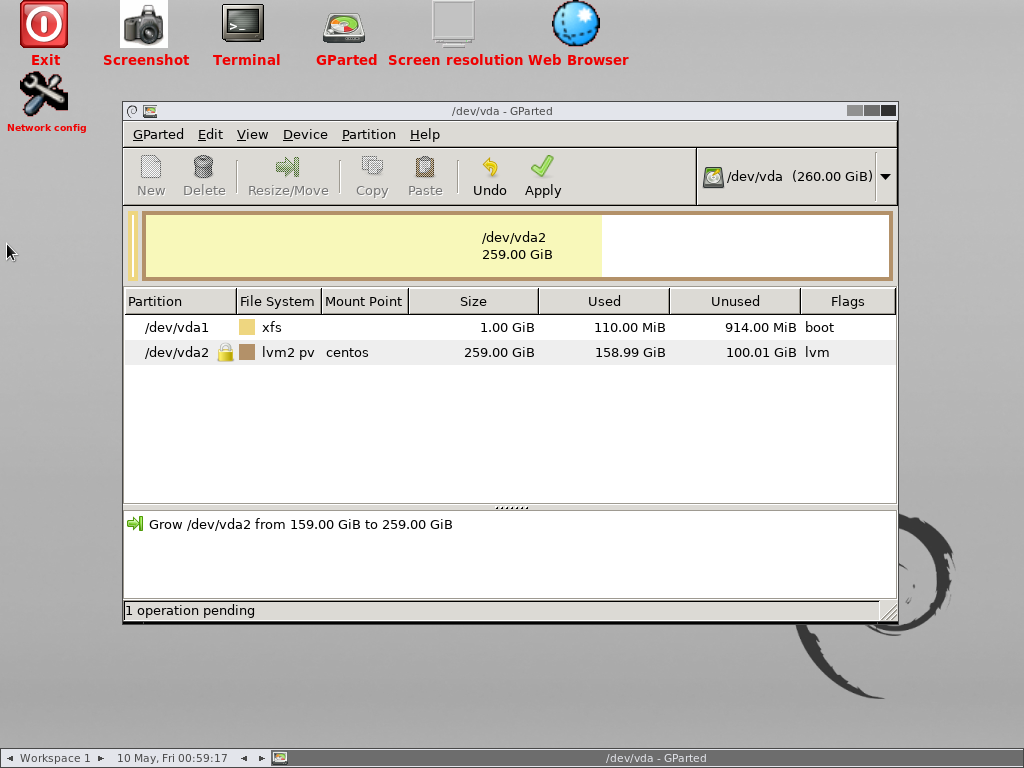
Select the LVM parition and click on Resize/Move.
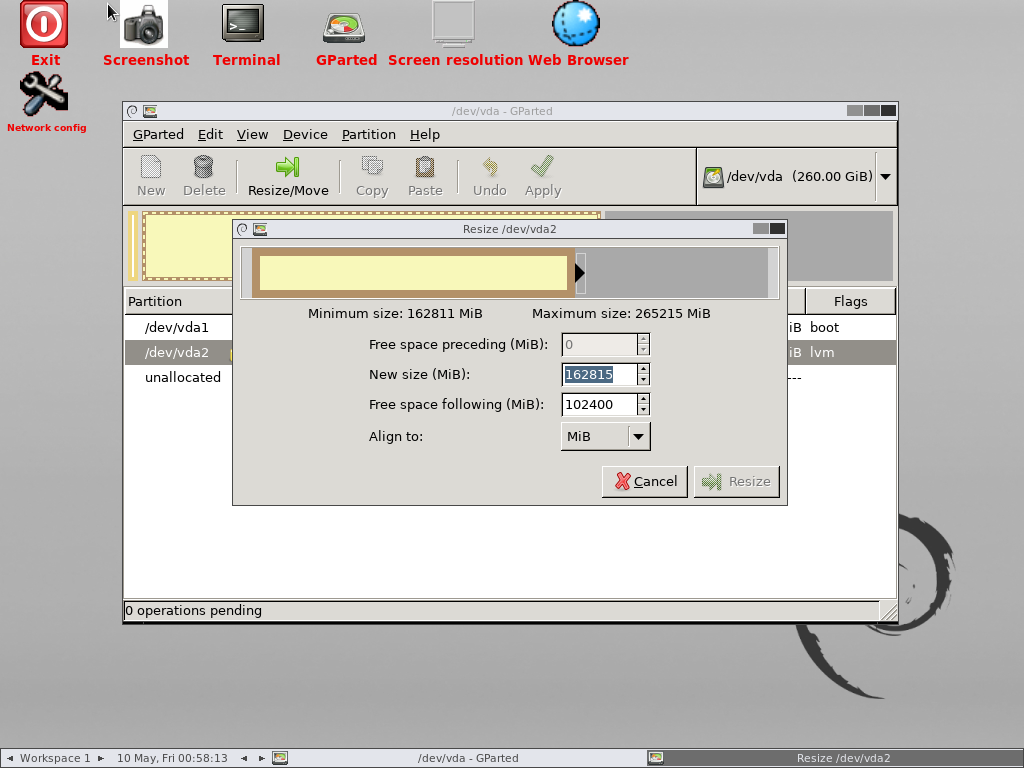
Drag the slider to fill in the remaining space and click Resize.
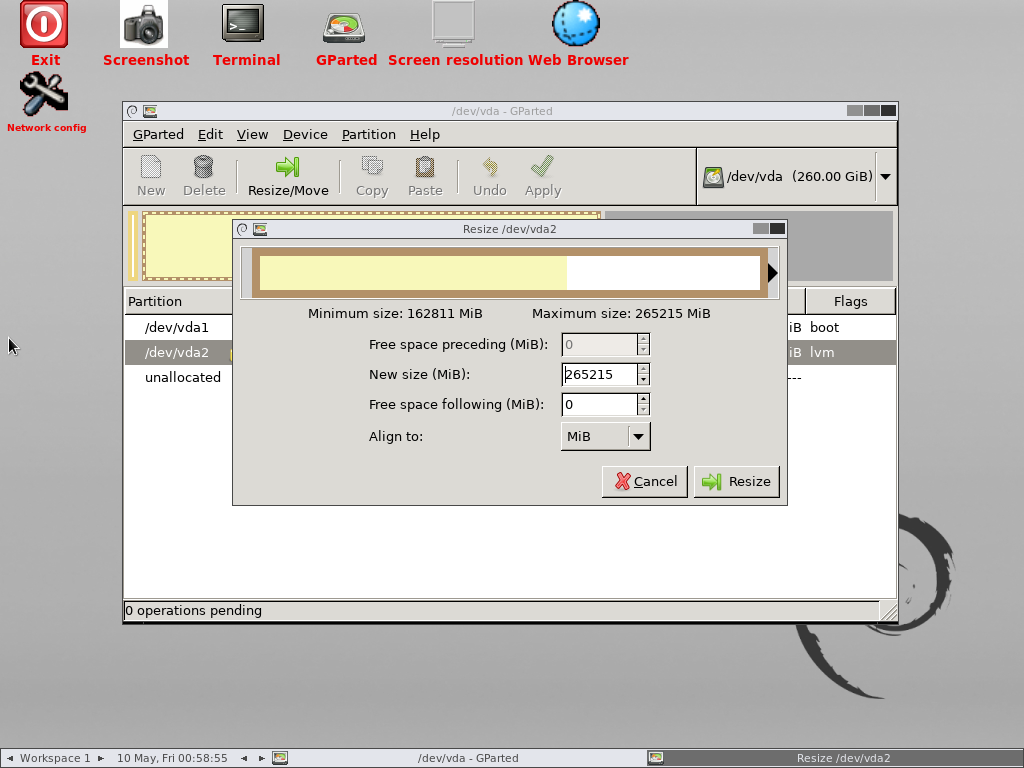
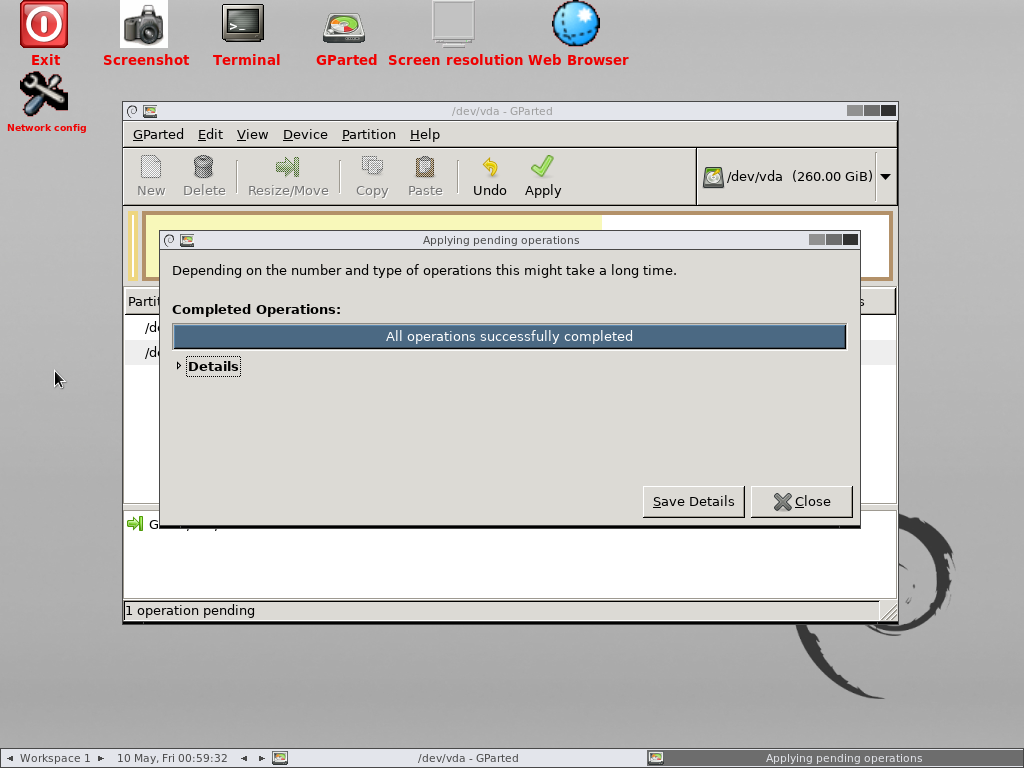
Click Apply.
Extend the Logical Volume
Close/minimize GParted and open the Terminal in the live environment.
We have to help the live environment disover the logical volumes. You’ll be able to use sudo without a password in all the following commands.
$ sudo pvscan
PV /dev/vda2   VG centos          lvm2 [<259.00 GiB / 100.00 GiB free]
Total: 1 [<259.00 GiB] / in use: 1 [<259.00 GiB] / in no VG: 0 [0   ]
$ sudo vgscan
Reading volume groups from cache.
Found volume group "centos" using metadata type lvm2
$ sudo vgdisplay
  --- Volume group ---
  VG Name               centos
  System ID
  Format                lvm2
  Metadata Areas        1
  Metadata Sequence No  5
  VG Access             read/write
  VG Status             resizable
  MAX LV                0
  Cur LV                3
  Open LV               0
  Max PV                0
  Cur PV                1
  Act PV                1
  VG Size               <259.00 GiB
  PE Size               4.00 MiB
  Total PE              66303
  Alloc PE / Size       40702 / 158.99 GiB
  Free  PE / Size       25601 / 100.00 GiB
  VG UUID               r8vEjh-ZHBf-WWfi-lBSb-xfSd-HiTy-02TPMe
You can see from the above information that our Volume Group is resizable and has 100GB available for expansion. Take note of the number after “Free PE / Size”.
Let’s confirm our available volumes.
$ sudo lvs
  LV   VG     Attr       LSize   Pool Origin Data%  Meta%  Move Log Cpy%Sync Convert
  home centos -wi-a----- 106.99g
  root centos -wi-a-----  50.00g
  swap centos -wi-a-----   2.00g
Now we’ll use the lvextend tool tool to expand our /home volume. The number noted earlier from the vgdisplay command will be used to signify the size increase.
$ sudo lvextend -l +25601 /dev/centos/home
  Size of logical volume centos/home changed from 106.99 GiB (27390 extents) to <207.00 GiB (52991 extents).
  Logical volume centos/home successfully resized.
Expand the Filesystem
Since Centos 7 defaults to XFS, we’ll use the xfs_growfs tool. This requires the filesystem to be mounted first, so lets create a mount point and mount it there.
$ sudo mkdir /mnt/home
$ sudo mount /dev/centos/home /mnt/home
Now run xfs_growfs to expand the filesystem into the available volume space.
$ sudo xfs_growfs /mnt/home
meta-data=/dev/mapper/centos-home isize=512    agcount=4, agsize=7011840 blks
         =                       sectsz=512   attr=2, projid32bit=1
         =                       crc=1        finobt=0 spinodes=0 rmapbt=0
         =                       reflink=0
data     =                       bsize=4096   blocks=28047360, imaxpct=25
         =                       sunit=0      swidth=0 blks
naming   =version 2              bsize=4096   ascii-ci=0 ftype=1
log      =internal               bsize=4096   blocks=13695, version=2
         =                       sectsz=512   sunit=0 blks, lazy-count=1
realtime =none                   extsz=4096   blocks=0, rtextents=0
data blocks changed from 28047360 to 54262784
Confirm the new volume size.
$ df -h
Filesystem               Size  Used Avail Use% Mounted on
udev                     489M     0  489M   0% /dev
/dev/sr0                 309M  309M     0 100% /run/live/medium
/dev/loop0               269M  269M     0 100% /run/live/rootfs/filesystem.squashfs
/dev/mapper/centos-home  207G   44G  164G  21% /mnt/home
You can see that your /home volume is now ‘207GB’ total in size.
Power off your VM and be sure to remove the optical drive from the boot list in virt-manager before booting into your Centos 7 install.
That’s it! Please let me know via email or comment if you have a more efficient way to accomplish this. Going forward, the best thing to do is to set the desired paritioning at install time.
Thanks for reading and happy hacking!
Leave a comment